
A practical guide from Packaging in Time to help you choose better materials, structure, printing, and finishing for custom boxes.

Custom display boxes turn a group of product units into a retail presentation. They make the product easier to notice, easier to understand and easier for staff to replenish. A well planned display can sit beside a checkout, occupy a planned shelf position, support a seasonal campaign or arrive as a shelf-ready tray that a store team opens and places directly into a fixture.
The display is therefore part packaging, part merchandising equipment and part operating tool. It has to look on-brand, but it also has to survive handling, keep units organized and fit the way the retailer actually stocks products. That combination is why display packaging should be specified around the real product, retailer and route to shelf rather than chosen from a generic shape alone.
For buyers, the practical question is not simply which display box looks most impressive. The useful question is which retail job the pack must perform. Is the goal to lift an individual carton above a crowded shelf, make small products easy to pick up at a counter, group several variants into a promotion, or reduce the time required for staff to stock a shelf?
Each goal points to a different combination of tray depth, front lip, header, product count, board, print coverage and outer case. This guide explains the choices that shape that specification, the checks worth completing before production and the information a packaging supplier needs to price a reliable display system.
What a custom display box is
A custom display box is a structure that holds and presents multiple saleable units at the point of purchase. Depending on the design, it can be a shallow tray, a countertop unit with a printed header, a shelf-ready case, a peg or clip-strip format, a freestanding floor display or a component within a larger promotional unit.
It is normally designed around a defined product arrangement: a number of rows, columns and facings, with enough retention to keep products aligned during delivery and customer selection. The display may be supplied empty for store assembly, packed with products at the fulfilment stage or integrated into an outer transit case. Those choices affect material, cost, operations and the way the display reaches the retail fixture.
It helps to separate three packaging layers early. The individual product carton or primary pack protects and identifies one unit. The retail display groups those units, controls their selling orientation and creates visibility at the fixture. The master shipper or transport case protects the packed display through handling and distribution.
In some shelf-ready systems, one corrugated case performs two roles by opening into a retail tray. In other systems, the display and outer case remain separate because the retail presentation needs cleaner edges, a different print treatment or more precise product retention. Treating the layers as distinct prevents a brief from asking one component to carry incompatible requirements.
A display box is also not automatically a shipping box, a rigid gift box or a generic product carton. It may use corrugated board for stiffness and efficient conversion, but that does not mean every corrugated style is a suitable display. It may use folding carton board for a compact counter unit, but that does not make it a replacement for a sturdy outer case.
The best solution usually comes from matching the display function to the product weight, unit shape, retailer fixture and handling route. A structural sample packed with the actual product is more informative than a beautiful digital rendering because it reveals how the front edge, side walls, dividers and product openings work in real use.
Display formats and the retail jobs they serve
Countertop displays
Countertop display boxes are compact units placed on checkout counters, service desks, sampling tables or promotional islands. They work best where shoppers are close to the products and the offer can be understood quickly. Small boxed goods, sachets, cosmetics, accessories and other quick-selection items are common candidates, although the correct product category depends on the retailer and any applicable product rules.
A countertop display normally needs a stable base, a front lip that reveals rather than hides the product, and a header that adds recognition without interfering with staff sightlines. The footprint must be confirmed with the retailer; a counter that appears generous in a store image may have strict limits on width, depth, height or placement.
The product removal path is central to countertop design. A customer should be able to take one unit without lifting several others, tipping the tray or damaging adjacent packs. Shallow trays can offer good visibility, but a very low front wall may allow units to slide during stocking or transport.
Taller front walls improve retention but can cover key product graphics. The answer is usually a measured balance based on the product dimensions and the viewing angle at the intended counter. When several variants share one display, use product order, divider positions and graphic cues to make selection obvious. If the display will be touched frequently, protect critical brand areas from rub points near openings and front edges.
Shelf ready trays and cases
Shelf-ready packaging is designed to reduce the work required to move products from a distribution case to a shelf. A typical system carries products in a corrugated case that staff can identify, open and place as a tray.
Perforations, tear strips, access panels and printed handling cues may help the conversion, but their usefulness depends on the actual store process. The design should be easy to recognize in the back room, open without loose debris, place securely and replenish within the available shelf space.
Industry guidance describes these goals as characteristics to design and validate, not as automatic properties of every case with a perforation.
A shelf-ready display must be considered from both closed and open positions. In its closed state, it needs to protect products through the expected distribution and fit the agreed case and pallet pattern. In its open state, it should provide a tidy retail face, maintain product alignment and leave enough of the product visible to shop.
The tear path should not damage product cartons or expose rough board edges in a way that undermines the presentation. Where the case becomes the display, print areas can need two communication hierarchies: handling and identification information for the closed case, and shopper-facing branding for the open tray. Reviewing both states on a physical sample avoids surprises.
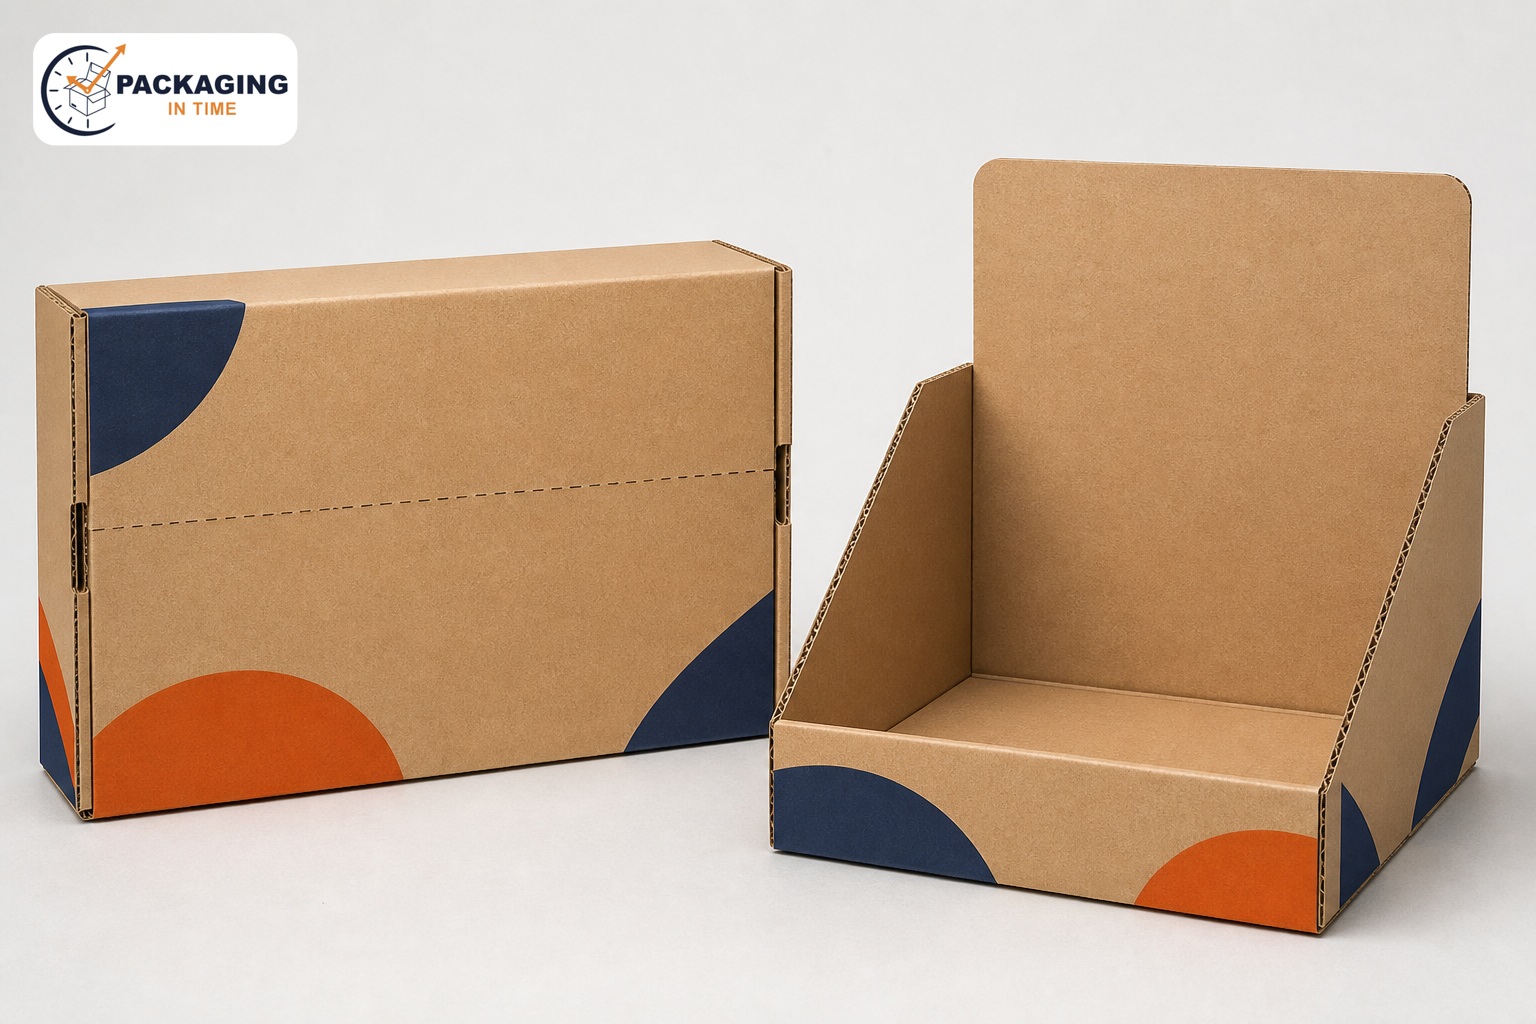
Shelf-ready concept: a corrugated case that can open into a retail display tray.
Floor standing and promotional displays
Floor standing displays create a larger retail presence and can hold several variants, larger quantities or a themed campaign assortment. They may be supplied as a single assembled unit, a base with trays, or a set of modules designed to be built in store.
Because they occupy floor space, they require more operational planning than a countertop tray. Confirm the allocated footprint, maximum display height, access routes, filled weight, base stability, replenishment access and the retailer's assembly expectations. A floor display that is difficult for one person to set up or that blocks a customer walkway can fail operationally even if its graphics and product presentation are strong.
The loaded display must have a clear structural load path. Product weight should transfer through intended panels and supports rather than relying on a decorative header or a lightly scored front panel. If displays are stacked, transported upright or handled on pallets, the engineering brief should state that explicitly.
The heaviest product variant, the likely quantity at launch and the expected replenishment pattern should all be assessed. A campaign display may begin full and become more vulnerable as stock is removed, so test both a full and a partially depleted state.
Retail teams also benefit from clear assembly instructions that match the final dieline, use simple visual steps and identify any components that must be kept separate until store setup.
Retail trays, dump bins and modular displays
Retail trays are usually shallow, open structures that organize cartons, pouches or containers in a defined orientation. They can be effective on shelves where the product itself carries most of the brand story and the display mainly provides order and a visible block of color.
A tray should be sized around the actual unit count rather than a theoretical tight fit. Products need room to be loaded and removed without catching on board edges, yet too much clearance can allow them to fall over or drift.
Dividers are useful when variants must stay separated or when a product's shape makes it unstable, but they also add material, assembly and packing time.
Dump bins and open promotional containers invite customers to browse a larger quantity of loose or semi-loose products. They are not appropriate for every product because stock can become disordered, packaging can scuff and a customer may need to reach into the unit.
If a dump-style arrangement is considered, confirm product durability, hygiene expectations, retailer guidance and whether the individual packs remain legible after repeated handling. Modular displays can combine trays, headers and base units to support several products in one campaign.
Their benefit is flexibility, but every module needs a clear replenishment and assembly sequence so the finished result remains consistent across locations.
Start the structure with the product unit
The individual product unit is the starting point for every display specification. Record its finished outer dimensions, weight, base shape, closure condition, fragility, preferred selling orientation and whether it varies by flavour, color, size or other variant.
Measure a sample rather than relying only on nominal artwork dimensions; seams, closures, labels and product tolerances can alter the real footprint. Decide whether products should face forward, lie horizontally, stand upright or be arranged in layers.
The answer affects the tray depth, wall height, divider design and the number of visible facings. It also influences how easily store staff can load the display and how a customer can remove one unit.
Next, define the product count at the display level. A strong retail presentation often has a deliberate number of rows and columns rather than simply the maximum number of units that fit inside a blank rectangle.
A low unit count may create a premium, easy-to-shop display; a higher count may reduce replenishment frequency. The right choice depends on sales velocity, fixture space, shelf depth and the retailer's case-pack rules. Leave enough working clearance for packing and removal.
A display that only works when every carton is pressed tightly together can become difficult to fill, especially where product dimensions vary slightly. Conversely, loose fit needs controls such as dividers, side walls or an adjusted front lip.
The selling orientation should remain stable from packing through shelf placement. If a product needs a front-facing panel visible to customers, design the pack-out so it naturally lands that way rather than requiring store staff to turn each unit manually.
Orientation marks, partitions or a tray profile can support that goal. For a product with a non-flat base, fitted cells or an internal support may be required. If units are tall relative to their base, consider how the display behaves when a customer removes one from the front row.
Testing the display with partly depleted rows is especially valuable because product-to-product support changes once the tray is no longer full.
Dimensions, fixture fit and planogram context
Retail fixtures impose practical limits that should appear in the packaging brief. For a shelf display, confirm shelf depth, shelf clearance, shelf lip, intended number of facings, position near other products and any restriction on headers.
For a counter unit, confirm the counter footprint, maximum height and whether staff need unobstructed access to payment equipment or service materials. For a floor display, identify the exact location, allowed footprint, customer flow and the retailer's policy for temporary promotional units.
These details are more useful than a broad instruction such as make it shelf ready because they tell the designer what physical envelope the structure must occupy.
Planogram fit is not only a matter of width and depth. Product recognition may depend on the display's front edge sitting below a key graphic panel, on variants being sequenced in a known order or on the header being visible from a particular aisle approach.
Ask whether the retailer wants a unit that stands flush with the shelf edge, sets back from it or locks into a fixture. Confirm whether price tickets, shelf talkers or security hardware will sit in front of the display.
If the display is expected to be used across several retail chains, map the most restrictive fixture requirement before finalising the dimensions, or create a modular solution only if the resulting operations remain manageable.
A sample should be placed in a representative fixture whenever possible. A dimensional drawing can confirm an envelope, but it cannot fully show sightlines, shopper reach, the interaction with shelf lips or the ease of replenishment.
Use the finished product, not empty placeholders, and include the expected row count. The review should check whether important wording is hidden, whether the front wall supports products without blocking their labels, whether the unit can be lifted into position and whether the display still looks intentional when it is partially sold through. Record any retailer feedback in the approved specification so it does not disappear between design, procurement and production.
Board, strength and structural detailing
Corrugated board is common for retail displays because it can provide useful stiffness, form trays and headers, and support efficient shipping configurations. The appropriate board construction is not determined by appearance alone. It depends on the total product load, the distance between supports, the size of the tray, how the display is stacked, the amount of handling, expected humidity and the outer case configuration.
A large front panel may need more support than a compact tray, while a display that becomes a transport case must handle a different set of stresses than a display supplied inside a separate shipper. Material selection should follow the actual load and route, not a generic statement that a certain board is strong.
Folding carton board can be appropriate for light, compact countertop formats where clean print and precise folds are important. It is not automatically interchangeable with corrugated material. A folding-carton display may need a separate outer case for distribution protection, while a corrugated display can sometimes integrate the retail and transport function.
Rigid board construction can create a premium presentation but is usually a different commercial choice from a high-volume retail tray. Discuss the display role, product count and shipping arrangement before selecting a material family. That conversation keeps the structural recommendation aligned with both the brand presentation and the handling requirements.
Details such as scores, folds, glue flaps, locking tabs, hand holes, perforations and tear strips should be treated as engineered features. A perforation that opens neatly on a sample may behave differently after printing, warehousing or exposure to changing conditions.
Tear paths should leave a clean retail edge and should not cut too close to packed products. A lock that is simple on a flat blank may be difficult for store staff to use if the unit requires several actions or if the product load puts stress on the joint.
Prototype the design at the intended scale, using the expected board and product, and ask the people who will pack, open and replenish it to test the sequence.
Product visibility, front lips and headers
The central visual trade-off in a display tray is retention versus visibility. A taller front lip helps hold cartons in place during movement, but it can hide product names, variant cues or mandatory information printed low on individual packs.
A lower front lip creates a more open presentation, but may require a deeper tray, better pack-out control or a different outer case to prevent products shifting before the display reaches the shelf. The right height can only be judged alongside the actual product.
Photograph the loaded sample from the customer viewing angle and from a store associate's perspective to see whether the display communicates clearly and can still be stocked quickly.
Headers add another layer of communication above the product line. They can introduce the brand, campaign, category or selection cue, especially where individual packs are small. The header should be sized for the viewing distance and the retailer's height limits, and it needs sufficient support so it does not bend during transport or lean after assembly.
Do not use the header as the only place for information a shopper needs to identify a product; it can be obscured by fixtures, sold-through stock or other displays. Design the product units and display to work together, with the display improving recognition rather than compensating for an unclear individual carton.
Graphic decisions also affect structural performance. Heavy ink coverage, coatings and finishes can influence scuff visibility and may change the way a scored or perforated area behaves. Keep critical copy away from folds, glue areas, cutouts and tear strips.
Allow reasonable tolerances around printed borders and registration-sensitive artwork. Where products have several variants, establish a consistent color, icon or text system so customers and staff can find the intended unit quickly. A display is often seen in a crowded aisle, so the hierarchy should be simple: identify the brand or category first, then distinguish the variant, then support the purchase decision with the information that matters at retail distance.
Artwork, print preparation and retail information
Artwork for a custom display box needs to account for the dieline as well as the marketing concept. The printed areas include exterior panels, internal tray surfaces, headers, outer-case faces and sometimes tear-away elements. Mark cut lines, folds, glue areas, perforations and non-print zones clearly in the production artwork.
Avoid placing essential text across a crease or through a perforation. If a shelf-ready case becomes the display, make sure the closed-case markings remain useful to warehouse and store teams while the opened tray presents the intended shopper-facing design. A structured artwork review should include marketing, packaging, supply-chain and regulatory stakeholders where relevant.
Print options should be selected for the required visual result and production method, not just for a finish name. Solid colors, fine type, large images, white ink, varnish and metallic effects can each require different preparation and quality checks.
If a display will be handled frequently, specify which panels are most exposed to rub and scuff. Proof the final artwork on the intended substrate when color matching, small text or a high-coverage design matters.
A digital screen proof cannot reveal every physical behavior of printed board. Packaging buyers should also confirm that each variant's artwork maps to the correct product orientation and pack-out position before authorising the production file.
Retail barcodes require careful location and verification. Whether a barcode appears on individual saleable units, the display, the outer case or more than one layer depends on the retailer and supply chain. Reserve a flat, sufficiently clear print area with the required quiet zones and avoid placements likely to crease, scuff or sit against a dark or highly reflective graphic.
Barcode scanning is affected by the final printed material, ink contrast, coating, placement and scanning environment. Follow the applicable GS1 requirements and verify the final production configuration; a barcode that appears sharp in a PDF should not be assumed to scan successfully in every retail condition.
Linking the display to the individual product pack
The display should support the product packaging system rather than compete with it. Individual cartons still need to carry the product identity, variant information and any information required for that product and market. The display can create a strong block of brand visibility, but shoppers may remove a unit from the tray and later encounter it without the display nearby.
Align typography, color, product names and variant coding across the system so the retail experience remains coherent. For brands developing both the shopper unit and the retail presentation, the broader approach can help define the individual carton before its display arrangement is finalised.
Do not duplicate every panel of individual-pack copy on the display. That can make the tray crowded and reduce the value of its larger visual surfaces. Instead, decide what the display needs to communicate at a distance, such as brand, category, campaign or a simple assortment cue.
Then ensure the individual pack provides the detailed information needed once a customer picks it up. This division of roles improves legibility and can prevent late artwork changes when an individual product label or carton requires an update.
It also makes the display more adaptable if the product range changes, provided the structural dimensions and the retail plan remain suitable.
Retail requirements, labels and compliance controls
Retail packaging requirements are specific to the customer, channel, product and market. Before approving a display, request the retailer's current guidance for fixture dimensions, case identification, barcode placement, shelf-ready formats, pallet configuration, display assembly and any required testing or sign-off.
These requirements can change, and a previous campaign is not a substitute for a current check. The packaging brief should identify which requirements originate with the retailer, which originate with the product owner and which must be confirmed by the supplier.
That clear allocation helps avoid a late reviewy that a display cannot enter a retailer's distribution system or fit its planned shelf position.
For food, cosmetics, pharmaceuticals, CBD products and other regulated categories, packaging claims and required information need product-specific review. A display tray is not automatically food-safe, compliant, recyclable, child-resistant, tamper-evident or suitable for a particular regulated use merely because its material or appearance resembles another pack.
The actual product contact layer, ink and coating system, market rules, warnings, retailer policy and evidence must be considered. The display may sit outside the primary contact layer, but it can still carry marketing statements, product imagery or instructions that need approval. Keep compliance sign-off separate from a visual artwork approval so both are documented.
CBD retail displays are a useful example of why the individual product layer and local requirements matter. A counter or shelf presentation can organize a CBD range, but it should not make unsubstantiated health claims or obscure the labels and information required on the saleable product.
Retailer policies and jurisdictional rules may determine whether and how the category can be displayed. Brands considering this use case can review a resource alongside their current legal, product-label and retailer guidance. The final display design should be approved for the specific market and product configuration, not copied from a generic category example.
Pack out, master shippers and the route to shelf
A retail display must reach the store in saleable condition. That requires a pack-out plan covering how the products sit in the display, whether the display is pre-assembled, what protects its printed surfaces, how many displays fit in an outer case and how the outer case is palletised.
The lowest-cost display blank is not always the lowest-cost delivered system if it needs complex assembly, excessive void fill or a separate protective component. Conversely, an integrated shelf-ready case may reduce store handling but can require more careful structural design. Review the full flow from product packing to warehouse storage, distribution, store opening, shelf placement and replenishment.
The outer case should be specified with the display's fragile points in mind. Headers, tall side walls, exposed corners and high-coverage printed faces may need protection from compression, abrasion or movement. If the display is shipped flat and assembled in store, account for the time, instructions and quality consistency that store assembly requires.
If it is shipped loaded and ready to place, account for its filled weight, the strength of locks and partitions, and the way it can be lifted without damaging the display. The design review should include the closed transport condition, the moment of opening and the final retail condition because each one places different demands on the same system.
Where distribution performance is important, test the actual packaged configuration. That means the real product or a representative production-equivalent, the proposed display, the intended outer case, the expected pallet or unit-load arrangement and the relevant shipping route.
A generic test result for an unrelated carton does not demonstrate the performance of a new display system. If an ISTA procedure or another test method is used, record the configuration, protocol, result and any limitations. Avoid making broad transit-tested claims unless there is current documentation for the exact design and route being represented.
Some brands also sell through direct-to-consumer channels. A retail display is rarely the right first layer for parcel protection, but it may be part of a broader campaign or fulfilment kit. In those cases, use a transport component designed for the parcel route and keep the retail display separate unless testing supports a combined configuration. A system can be evaluated for the direct-to-consumer layer while the display remains focused on merchandising at the destination.
Environmental language and material decisions
Material choices are increasingly important to brands and retailers, but environmental language needs to be specific. Recycled content, fibre sourcing, recyclability, compostability and end-of-life handling can vary with board construction, coatings, adhesives, inks, local collection systems and the final packaging configuration.
A display made primarily from paper-based board does not automatically justify an unqualified environmental claim. State the relevant attribute, the scope of the claim and any conditions needed for it to be accurate. If a certification or recycled-content statement is important, obtain the applicable documentation for the materials and supply chain rather than relying on a visual assumption.
Reducing unnecessary material can be a sensible design objective, but it should not compromise retail stability or result in higher damage, waste or additional protective components. Look first at the product count, void space, dividers, duplicated layers, display footprint and ability to reuse one structure across a campaign.
A more efficient display often begins with a better defined pack-out and fixture requirement, not simply a thinner board. Consider the display's expected duration on shelf and whether it must stay presentable through a long promotion. The most suitable material decision balances the product, route, retail experience and supportable environmental information.
Prototype, approve and release with control
A disciplined prototype stage saves time later. Begin with a structural sample to check product fit, loading sequence, front-lip height, header visibility, locks, tear paths and fixture dimensions. Then review a printed sample or production-representative proof for artwork placement, color, small type, perforations and scuff-prone surfaces.
Include the people who will pack the products, set the display in store and approve retailer requirements. Their feedback can expose issues that are invisible in a design meeting, such as a display that takes too long to assemble, a tray that does not sit flat on a shelf or a header that prevents the outer case from closing correctly.
The approved production specification should identify the dieline version, board or substrate, print treatment, product unit dimensions, unit count, pack-out drawing, outer-case arrangement, barcode locations, approved artwork files and required inspection points. Treat a change to any of those inputs as a potential design change.
A new product variant, a heavier fill, a revised retailer fixture or a different distribution route can affect the display even if the overall artwork looks similar. Version control is especially important for perforated shelf-ready cases because a small change to board, score or product arrangement can change opening performance and the final retail appearance.
Frequently asked questions
What is the difference between a display box and a product box?
A product box is the saleable pack for one item. A display box groups and presents several units in a retail fixture. The product box needs to stand on its own once a shopper removes it; the display improves visibility, organization and replenishment at the point of sale.
Can a display box also be a shipping case?
Sometimes. A shelf-ready corrugated case can be designed to open into a retail tray, but it must perform in both closed transport and opened display conditions. Whether that is suitable depends on product weight, pack-out, retail requirements and the actual distribution route.
Which material is best for retail display packaging?
There is no single best material. Corrugated board often suits trays and shelf-ready systems; folding carton board can suit lighter, compact counter units; and other constructions may be selected for a particular presentation. The right choice follows the product load, fixture, print result, distribution and assembly needs.
How high should the front lip be?
It should retain the products while leaving enough of the saleable pack visible for a shopper to identify it. The appropriate height depends on the product dimensions, shelf angle, expected handling and whether a partially depleted display must remain stable. Review it with the real product in a sample.
Do shelf-ready displays need retailer approval?
Retailer requirements commonly govern shelf dimensions, opening method, case identification, barcodes and replenishment. Obtain the current packaging guidance for the specific retailer and include it in the brief before the structure is finalised.
Can a display box carry a recycling or sustainability claim?
Only where the claim is accurate, specific and supported for the finished configuration and relevant market. Board, coatings, adhesives, collection systems and the scope of the claim all matter. Avoid broad claims without supporting information.
Should barcode verification happen before production?
Artwork review should reserve a suitable barcode area, but final verification should account for the printed substrate, coating, placement and intended scanning conditions. Follow applicable GS1 guidance and the retailer's current requirements.
What makes a display quote more accurate?
Provide product samples or dimensions, product count, fixture measurements, desired display format, artwork needs, pack-out, delivery route, target quantity and retailer requirements. A supplier can then price the complete system rather than an incomplete box shape.
Plan the display as a retail system
The most effective custom display boxes make the product simple to find, simple to choose and simple for a retailer to manage. They do that by combining an appropriate retail format with realistic product fit, fixture dimensions, structural support, artwork hierarchy and a route-to-shelf plan.
The display is not a decorative afterthought around a finished carton. It is a specific packaging layer with its own operational role, and it works best when the individual product pack, transport case and store process are considered together.
Start with the retail job, confirm the product arrangement and fixture, then test the complete system in the conditions that matter. A structured brief gives designers, suppliers and retail teams the information they need to create a display that looks intentional on shelf and remains workable behind the scenes. When the requirements are clear, the final display can support both brand presentation and everyday retail execution without relying on unverified material, compliance or performance claims.